🔒 Granting Access
For Sailpoint IdentityNow documentation on how to generate API Client Credentials or Personal Access Tokens, please use this link.
API Client Credentials(One-Directional Integration only)
- To grant access you will need to be an administrator of SailPoint IDN.
- Login to your Administrator's Portal for IDN, and proceed to the Admin > Global section.
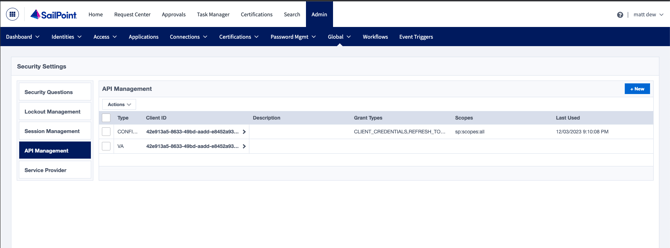
- Select API Management, and click New.
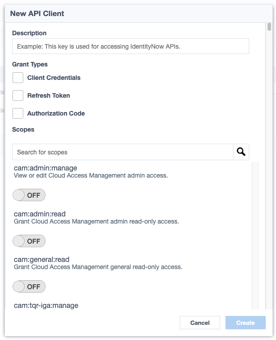
- Provide a detailed description for the API Client.
- Ex: "This token is for Unify Insights to pull identities from our SailPoint IDN instance for creating an Identity Profile."
- For Grant Types, select "Client Credentials"
- In the Scopes Field, search for the "search" string, and grant the sp:search:read scope.
- Click Create and securely store the Client ID and Secret to submit to Unify via the Integrations Page.
✅ Permissions
Living Security leverage's the search endpoint with a hardcoded query filter for *identities to pull identities into Unify. This will require your organization to grant the sp:search:read scope.
⚠️ Required Information
The values Living Security will need to access the API are:
- SailPoint IDN Host URL
- Ex: hostname.api.identitynow.com
- Client ID
- Client Secret
API Personal Access Token (Bi-directional)
To create a personal access token:
- Select the User icon
 from the upper-right corner of the page.
 - From the dropdown menu, select Preferences.
- Select Personal Access Tokens from the left menu and select New Token.
- Specify where this token will be used in the What is this token for? field. This can help you recognize when a token is no longer needed and can be deleted from Identity Security Cloud.
- Set an expiration date for the personal access token. By default, the expiration date is set for 6 months. If this field is left blank, the token is created with no expiration date.The token will expire at midnight on the designated date. For example, if the expiration date is set to 08/03/2026, the token will expire at 12:00 AM on August 3. To set a different time, use the Create Personal Access Token API to create the token.As a token's expiration date draws near, you can update it to prevent interruptions in service.
- Use the toggles to select the desired scopes. For Unify and Living Security Platform, we will need the below scopes:
-
sp:search:read
-
sp:workflow:read
-
sp:workflow:manage
-
sp:workflow-execute:external
-
- Select Create Token at the bottom of the window to generate and view the Secret and Client ID.
- Save the Secret value somewhere safe.
You can now use this personal access token. Select the Edit icon ![]() in the Actions column to update the description, expiration date, or scope for this token.
in the Actions column to update the description, expiration date, or scope for this token.
✅ Permissions
-
sp:search:read
-
sp:workflow:read
-
sp:workflow:manage
-
sp:workflow-execute:external
⚠️ Required Information
The values Living Security will need to access the API are:
- SailPoint IDN Host URL
- Ex: hostname.api.identitynow.com
- Client ID
- Client Secret
