Identity Provider instructions*
Note:
If your identity provider is not listed in this guide the tables below are still valid if you are able to locate the configuration page where you can specify attributes for SSO assertions. For questions or assistance please contact help@livingsecurity.com
Okta
- In your Okta Admin console navigate to the Living Security application you created to establish single sign-on. Click the General tab, scroll down to SAML Settings and click Edit.

- Click Next and scroll down to the Attribute Statements section. Here we'll define custom attribute statements to be inserted into the SAML assertions shared with the Living Security app. Refer to the following table and make the necessary changes:
Name Name format Value http://schemas.xmlsoap.org/ws/2005/05/identity/claims/givenname URI Reference user.firstName http://schemas.xmlsoap.org/ws/2005/05/identity/claims/surname URI Reference user.lastName http://schemas.xmlsoap.org/ws/2005/05/identity/claims/jobtitle URI Reference user.title http://schemas.xmlsoap.org/ws/2005/05/identity/claims/country URI Reference user.countryCode http://schemas.xmlsoap.org/ws/2005/05/identity/claims/department URI Reference user.department http://schemas.xmlsoap.org/ws/2005/05/identity/claims/companyname URI Reference user.organization http://schemas.xmlsoap.org/ws/2005/05/identity/claims/roles URI Reference user.roles http://schemas.xmlsoap.org/ws/2005/05/identity/claims/division URI Reference user.division http://schemas.xmlsoap.org/ws/2005/05/identity/claims/managername URI Reference user.manager http://schemas.xmlsoap.org/ws/2005/05/identity/claims/manageremail URI Reference http://schemas.xmlsoap.org/ws/2005/05/identity/claims/city URI Reference user.city - Now click Next near the bottom of the page and then Finish at the next page presented.
- Attempt a user login from your organization to app.livingsecurity.com and you will see the user is now present with the attributes specified in the user management page of the Living Security application.
Note:
Your organization's variables might differ from what is in the Value column in the previous table. If that is the case, navigate to Directory > Profile Editor then click Profile next to Okta's User (default) to show them.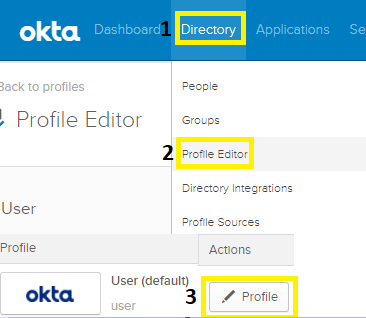
Azure
- From Azure Active Directory enter the Enterprise Application you previously created for Living Security to establish Single Sign-On.
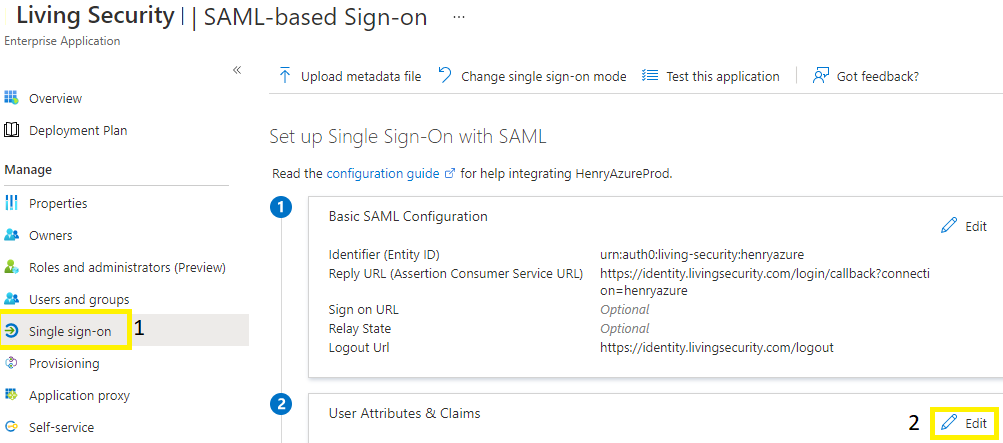
- Reference the following table and the Add new claim button until your configuration matches the image:

Claim name Value http://schemas.xmlsoap.org/ws/2005/05/identity/claims/city user.city http://schemas.xmlsoap.org/ws/2005/05/identity/claims/companyname user.companyname http://schemas.xmlsoap.org/ws/2005/05/identity/claims/country user.country http://schemas.xmlsoap.org/ws/2005/05/identity/claims/department user.department http://schemas.xmlsoap.org/ws/2005/05/identity/claims/emailaddress user.mail http://schemas.xmlsoap.org/ws/2005/05/identity/claims/givenname user.givenname http://schemas.xmlsoap.org/ws/2005/05/identity/claims/jobtitle user.jobtitle http://schemas.xmlsoap.org/ws/2005/05/identity/claims/name user.userprincipalname http://schemas.xmlsoap.org/ws/2005/05/identity/claims/roles user.usertype http://schemas.xmlsoap.org/ws/2005/05/identity/claims/state user.state http://schemas.xmlsoap.org/ws/2005/05/identity/claims/surname user.surname - Attempt a user login from your organization to app.livingsecurity.com and you will see the user is now present with the attributes specified in the user management page of the Living Security application.
PingOne
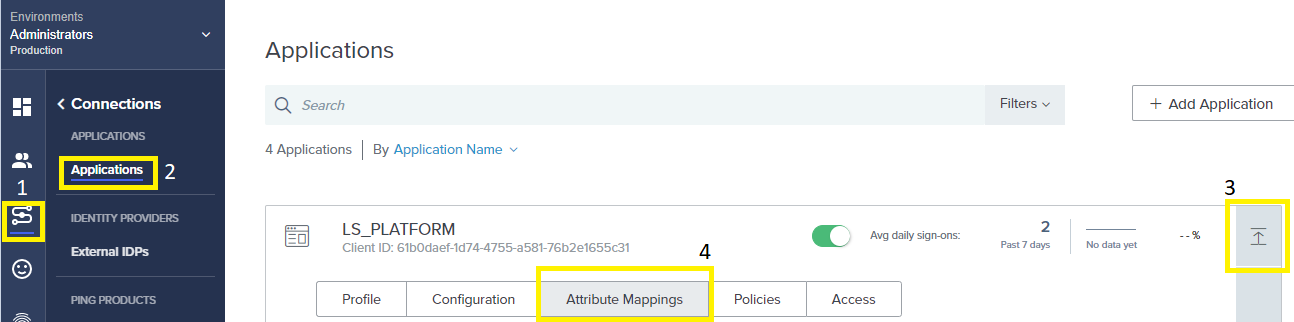
- Within the Ping Admin console navigate to the Living Security application you created by clicking Connections > Applications. In this pane edit the current application connection by dropping down the arrow and then click the Attribute Mappings tab when expanded.
- Now click the pencil icon to edit the attribute mappings. Reference the table below and make the appropriate changes until your configuration matches the image:
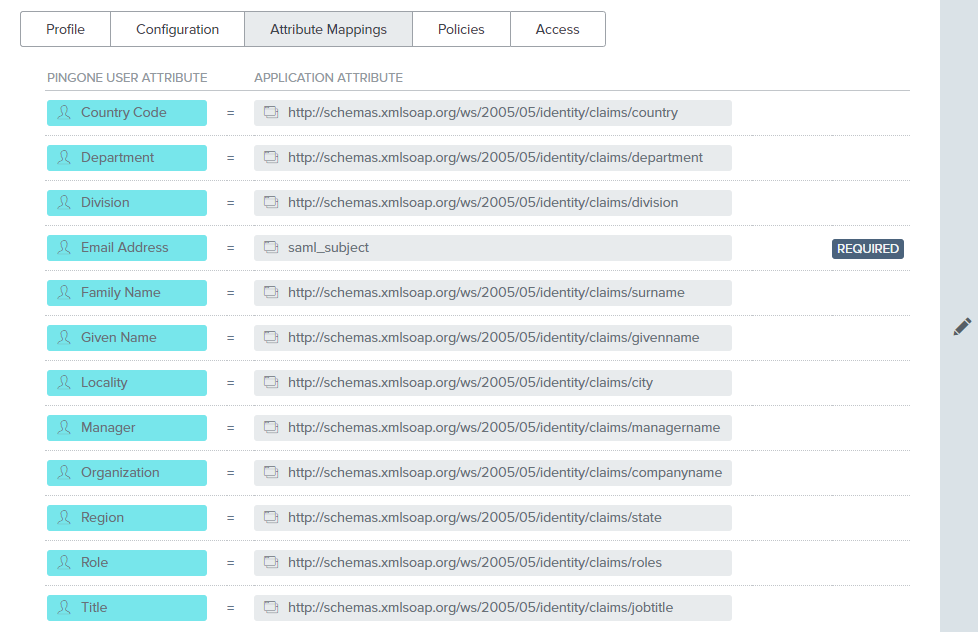
PINGONE USER ATTRIBUTE APPLICATION ATTRIBUTE Country Code http://schemas.xmlsoap.org/ws/2005/05/identity/claims/country Department http://schemas.xmlsoap.org/ws/2005/05/identity/claims/department Division http://schemas.xmlsoap.org/ws/2005/05/identity/claims/division Email Address saml_subject Family Name http://schemas.xmlsoap.org/ws/2005/05/identity/claims/surname Given Name http://schemas.xmlsoap.org/ws/2005/05/identity/claims/givenname Locality http://schemas.xmlsoap.org/ws/2005/05/identity/claims/city Manager http://schemas.xmlsoap.org/ws/2005/05/identity/claims/managername Organization http://schemas.xmlsoap.org/ws/2005/05/identity/claims/companyname Region http://schemas.xmlsoap.org/ws/2005/05/identity/claims/state Role http://schemas.xmlsoap.org/ws/2005/05/identity/claims/roles Title http://schemas.xmlsoap.org/ws/2005/05/identity/claims/jobtitle - Attempt a user login from your organization to app.livingsecurity.com and you will see the user is now present with the attributes specified in the user management page of the Living Security application.
*SCIM and JIT provisioning may not be used together.
