Install the Add-in
Uninstall the Add-in
Update the Add-in
FAQ
Install the Add-in
-
Go to script.google.com and click on the New Project button.
-
The new script file that is opened is saved with a project name.
-
In the Code.gs, paste the script code provided by the platform and save it.
-
Go to the settings icon and click Project Settings.
-
In the project settings, click: Show "appsscript.json" manifest file in editor.
-
Save the appscript.json file. Copy and save the manifest code.
- Go to console.cloud.google.com and create a new project.
- Name your project and select the location. Then click on Create to start your project.
- Go to the API & Services page. Open the OAuth content screen page from the left menu and select your project.
- Please make sure the User type option selected is Internal.
- Click Create
-
On the OAuth content screen, fill in the App Name, User Support Email, App Logo and Developers Contact Email Address. Then click Save and Continue.
-
After that, click the Save and Continue button again on the Scope screen without making any changes. Then click Back to Dashboard.
-
Go to API & Services, open the Library page to search Gmail API, and then enable it.
-
Go to Project Settings and copy the Project Number.
-
On the Cloud Platform project page, paste the Project Number in the designated field and click Set Project.
-
Confirm the project change.
Testing the Add-in
If you don't want to test the add-in in your Gmail account, please go to the "Enable Google Workspace Marketplace SDK" part to distribute the add-in to the organization.
If you want to test and see the add-in functionality, logos, add-in name, description, and more information, you can deploy the add-in to your Gmail account for test purposes and remove it anytime.
-
Go to script.google.com
-
Select the add-in project.
-
Click on Deploy >Test Deployments > Install button.
-
Click Done.
The add-in will appear on your Gmail account shortly.
-
From the Library page, search for the Google Workspace Marketplace SDK and click on it.
-
Click the Enable button and activate Google Workspace Marketplace SDK.
-
Go back to script.google.com and click on the manifest file. Click Deploy.
-
In the deployment settings, select Add-on then copy the Deployment ID.
-
Go back to the Console Cloud. Go to the API & Services page, find “Google Workspace Marketplace SDK” and click on it.
-
Go to the App Configuration tab and enable the Google Workspace add-on option and check Deploy using Apps Script Deployment ID.
-
Then paste the Deployment ID to the deployment field on the page and then fill the following fields.
-
Developer Name with Keepnet Labs.
-
Fill in the Developer Website URL with https://keepnetlabs.com
-
Fill in the Developer Email with support@keepnetlabs.com.
-
-
Before saving, do not forget to select the Private option and then click Save.
-
Go to the Google Workspace Marketplace SDK page and click the Manage button to see the Store Listing menu, Select the Category and upload your company logo.
-
Fill in the Terms of Service URL, Private Policy URL, and Support URL with https://keepnetlabs.com for the add-in.
-
Under Distribution, select the Region that you will be deploying the add-in to and click Publish.
- To deploy the add-in, go to the Google Apps icon in the top right-hand corner of the screen.
- Scroll down to More from Google Workspace Marketplace and click on it.
- Click Internal Apps and find the add-in
- Click the Admin Install button to start the deployment process.
- Click Continue to start the distribution of the extension.
- Accept the required permissions to complete the deployment.
Note: It may take up to 24 hours for this app to be installed for your entire Google Workspace domain or organizational unit.
-
Click on the Phishing Reporter add-in you want to uninstall.
-
Click Delete App to complete the process.
Note: It may take up to 24 hours for this app to be uninstalled for your entire Google Workspace domain or organizational unit.
Update the Add-in
When you make a change to the reporter button, you'll have to republish it to the Google Store.
To do so, please follow these steps:
Generate a new Deployment ID
- Navigate to script.google.com
- Make the necessary changes, or if you've made the changes in the phishing tool UI, paste in the contents of the newly generated Code.gs.
- Select Deploy from the upper-right and click New Deployment.
- Optionally, fill out an appropriate description and then Deploy.
- Copy the Deployment ID generated and save it somewhere for the next step.
Republish the add-in
- Go to http://console.cloud.google.com/
- Click APIs & Services from the Quick access area near the bottom.
- Select Google Workspace Marketplace SDK from the filter list.
- Now, click the APP CONFIGURATION tab.
- Find the Deployment ID field and paste in the ID you generated in the previous step.
- Click SAVE DRAFT.
- Click STORE LISTING.
- Scroll to the bottom and select PUBLISH.
- Click Project Settings (gear icon) from the left-hand menu
FAQ
A: No, there is no charge by Google.
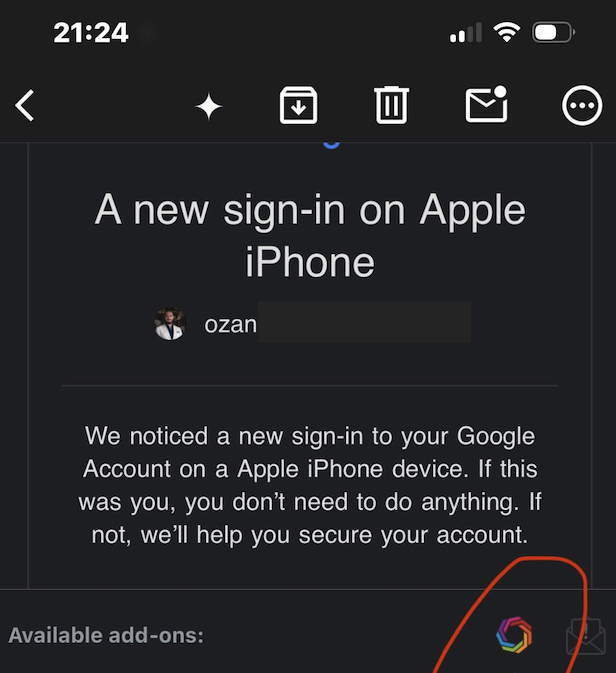
Q: Can I use my phishing reporter add-in in the Gmail app on iOS or Android?
A: Yes, you can use the Phishing Reporter add-in in the Gmail App on Android or IOS. The reporter can be found at the bottom of the email next to "Available add-ons":
If the reporter is blocked, here are alternative steps you can take within Google Workspace:
1. Report via Gmail’s “Report phishing” feature
• Open the suspicious email
• Click the three-dot menu (⋮) in the top-right
• Select “Report phishing”
This notifies Google and may flag the email internally, though it doesn’t forward to your infosec mailbox.
2. Manually forward the email as an attachment
• Open the message, then click “⋮” → Download message (.eml file)
• Create a new email to infosec@contoso.com, attach the .eml file, and send it
