ℹ️ To complete this procedure, you must have security administrator privileges with Google Workspace.
Google Workspace IP Bypass
This will be a walk-through on whitelisting emails by IP based in the Google Workspace platform. The below instructions will show you how to whitelist the emails such as notification, training or phishing simulation emails that will be sent from the platform to users by IP address in the Google Workspace environment.
-
Note the IP addresses to be allowed.
-
Select Apps > Google Workspace > Gmail from the left sidebar menu.
-
Go to the Spam, Phishing, and Malware page.
-
Select the Email allowlist tab and click the Edit button.
-
Add the IP addresses that are listed here.
-
Click the Save button.
-
Go back to the Spam, Phishing, and Malware page.
-
Select the Inbound Gateway option and click Enable, if not enabled.
-
Add the IP addresses and click Save.
-
Select Automatically detect external IP if not already selected.
-
WARNING: Leave the option of Reject all mail not from gateway IPs unchecked.
-
This option must be 'unchecked'. Do not enable this option!
-
-
Select the option of Require TLS for connections from the email gateways listed above.
-
Click Save to complete the process.
Google Workspace Spam Filter Bypass
- Log in to the google admin center here.
- Click Apps > Google Workspace > Gmail.
- Scroll down and click Compliance.
- Go to the Content Compliance section and click CONFIGURE or ADD ANOTHER RULE button.
- Add Setting pop-up will appear.
- Enter a description of the whitelisting rule.
- Under the Email messages to affect menu, select the Inbound, Internal-Sending, and Internal-Receiving options.
- Scroll down to Add expressions that describe the content you want to search for in each message. Under this, select If ANY of the following matches the message. Then under Expressions, click ADD.
- On the top of the window, change the Simple Match to Advance Content Match option and use the following settings:
- Location: Full Headers
- Match Type: Contains Text
- Content: X-KEEPNET-TID
- Under, If the above expressions, do the following scroll down to Spam and select: Bypass spam filter for this message.
ℹ️ Google will insert the gray "This message was not sent to Spam based on your organization's settings" banner at the top of simulated phishing emails. To mitigate this, please follow the steps below.
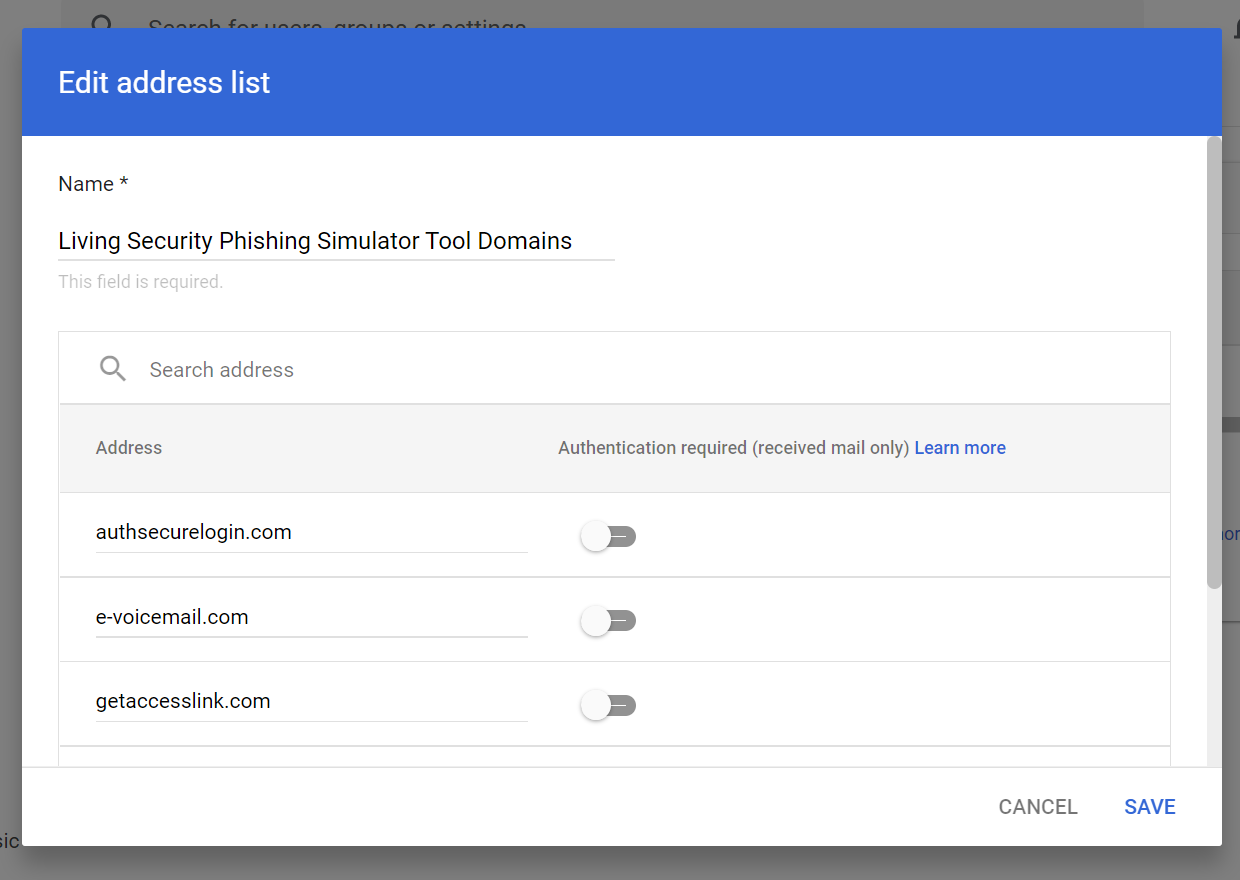
Manage Address List
Use the following steps to add the Phishing Simulator Tool domains to the address list.
- Sign in to Google Admin.
- Select Apps > Google Workspace > Gmail > Spam, phishing, and malware.
- Scroll down to Spam.
- Select Add Another Rule or Edit.
- Select Create or Edit list.
- Select Edit under Actions > Add Address/Bulk Add Addresses
- Enter the domains from the Phishing Simulator Tool - to find this list in the Phish Tool, navigate to Phishing Simulator > Settings.
- Ensure that Authentication required is toggled off for all domains, then Save.
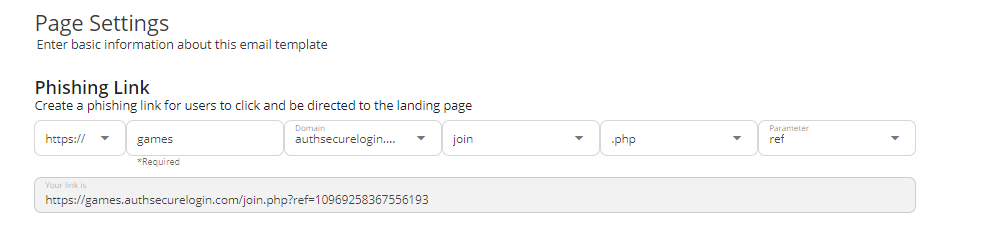
Simplify Landing Page Link
Google has identified some of the default landing page links as spam due to their length, hence why the grey banner appears for phishing simulations. A workaround solution for this is to shorten and simplify the landing page link of the scenario which is being used. To do this, please follow the steps below.
1. Navigate to Phishing Simulator > Phishing Scenarios > Landing Page Templates
2. Find the landing page of your choice, select the three dots icon under Actions, then Duplicate.
3. On Page 2, Page Settings, adjust the landing page link. It is recommend to remove numbers from the URL section. Do not worry if you see numbers at the end of the link.